Kielbasa Skillet

Kielbasa Skillet with Egg

In recent years I have come to appreciate the versatility of Kielbasa sausage, and realize it isn’t just for grilling.

Kielbasa is milder than Andouille or Chorizo, comes in a long u-shape form, usually isn’t smoked, and is full of garlic. It works great in a variety of soups, stews (try it in Kielbasa Stew), and even chili, as well as sautéed with potatoes and vegetables, or used as a breakfast meat. Or grill it and put it on a bun with your favorite toppings.

Kielbasa Skillet Ingredients

This skillet kielbasa meal is great for any time of the day and can be adapted to whatever you like. You could certainly add broccoli, or another vegetable of your choosing. I like to make this in the fall when I have a fresh garden harvest of potatoes, snap peas, bell peppers, tomatoes, spinach, and onions or chives.

Microwave the potatoes first to cut down on cooking time, then put them in the refrigerator to cool a bit before cutting them up. While the potatoes are cooling, I prepare the rest of my ingredients.

Kielbasa Skillet Potatoes

Use a nonstick pan when cooking potatoes since they tend to stick to stainless steel quite well. Medium heat seems to crisp them up perfectly in about 5 minutes, but you might need to turn it down to medium low after adding the sausage and other vegetables to prevent things from burning.

Kielbasa Skillet Spuds and Veg

When adding the sausage and veggies there is no need to add more oil since the sausage will render out fat.

It is also important to season in layers, so I add about half of the seasonings with my potatoes, and the other half with the sausage and veggies, as well the mustard with the sausage and veggies.

Kielbasa Skillet Greens and Kraut

In the last couple of minutes, stir in the greens and sauerkraut. If it’s not summer or fall, I have power greens from Earthbound Farm in my fridge, so I use that. The power greens mix has baby spinach, kale, and chard. But using just spinach or kale works too.

I also make my own sauerkraut using purple cabbage, so I have purple sauerkraut. But regular sauerkraut is just fine. Make sure you drain the sauerkraut first.

Now you are ready to eat. This is great as is, but you can top it with whatever you desire, cheese, avocado, a fried egg, fresh tomatoes…

Enjoy!

Kielbasa Skillet

A quick skillet meal that can be served for breakfast, brunch, lunch, or dinner. Full of vegetables and flavor!
Prep Time15 minutes
Cook Time15 minutes
Total Time30 minutes
Course: Breakfast, Brunch, Dinner, Lunch
Cuisine: American
Keyword: kielbasa, Kielbasa Skillet, Skillet Meals
Servings: 4 people
Calories: 237kcal
Author: Eating With Deb

Equipment

  • Cutting board and knife
  • Large nonstick sauté pan and heat resistant spoon
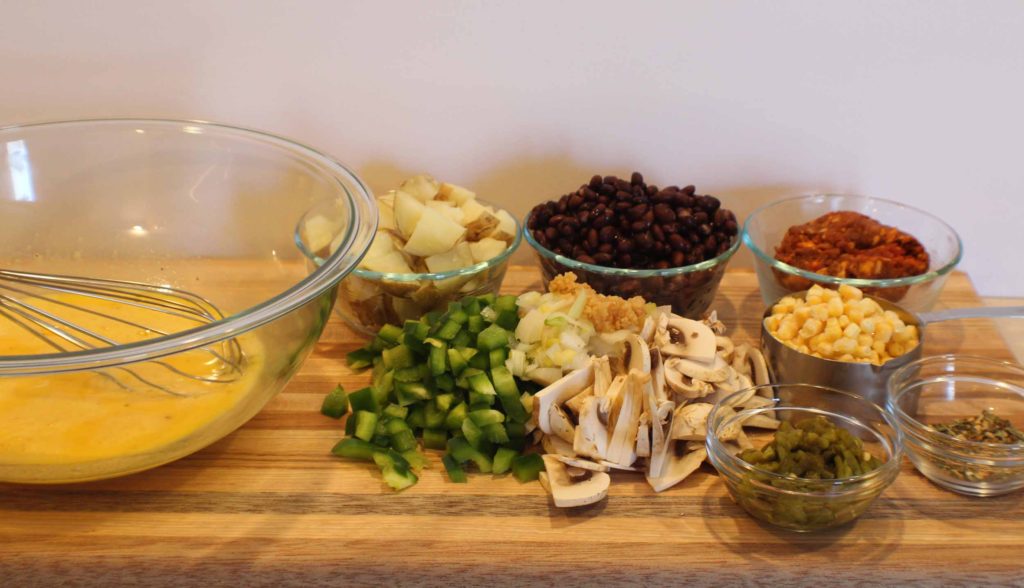
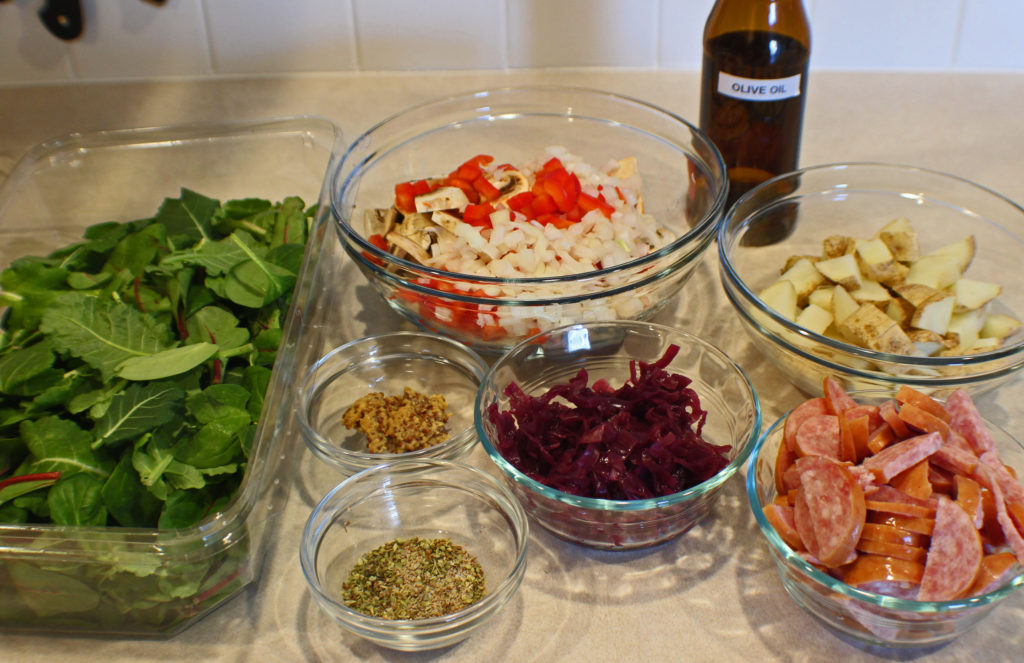
Ingredients

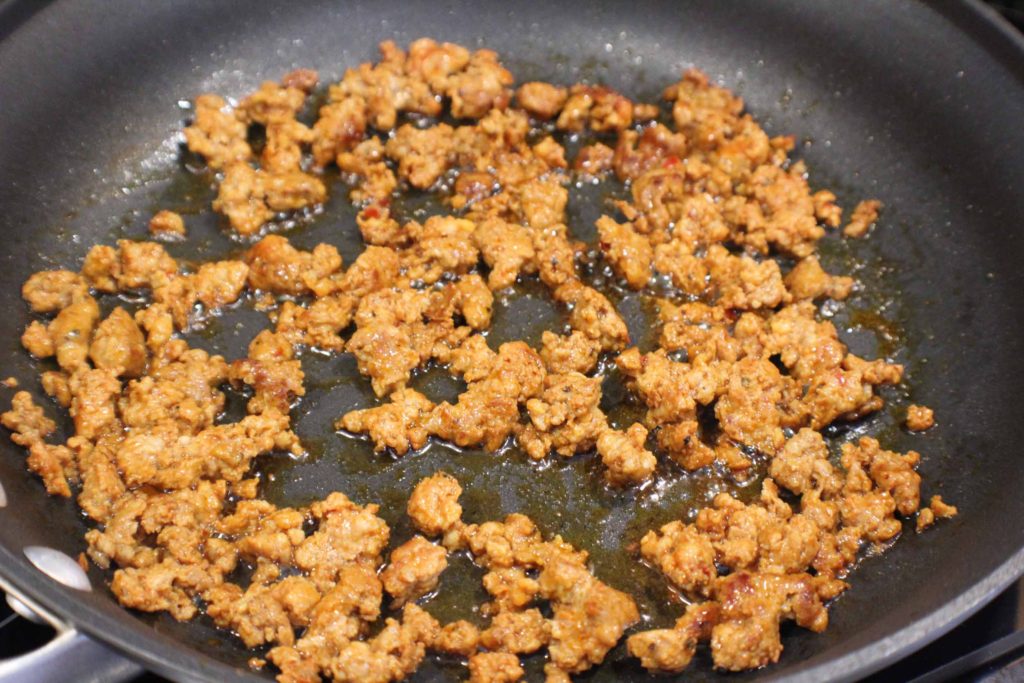
  • ½ pound kielbasa sausage sliced in ½ moons
  • ½ each red bell pepper diced
  • ¼ each yellow onion diced
  • 8 each button mushrooms sliced
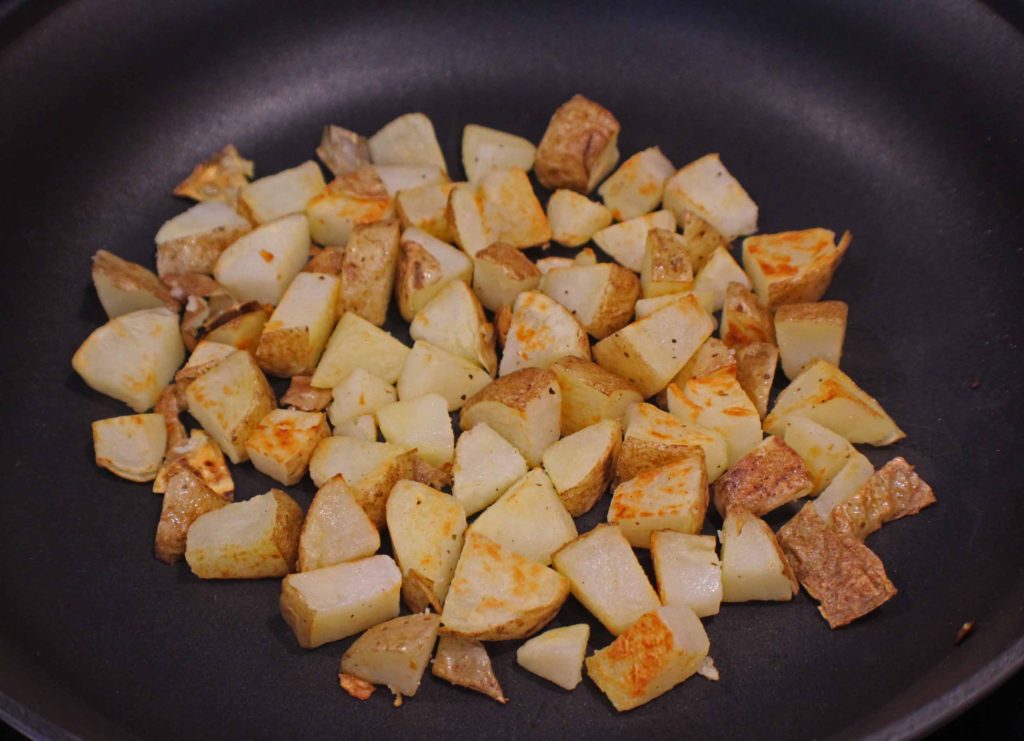
  • 2 each russet potatoes
  • 1 cup sauerkraut
  • 4 cups fresh spinach or 4 handfuls
  • 1 tbsp olive oil
  • 1 tbsp Dijon mustard or brown mustard
  • 1 tsp oregano
  • ½ tsp black pepper
  • ½ tsp sea salt
  • ½ tsp granulated garlic
  • ¼ tsp chipotle pepper
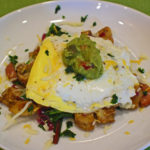
Optional Toppings

  • Fried Egg
  • Avocado slices or Guacamole
  • Shredded cheese
  • Fresh diced tomatoes
  • Sour cream

Instructions

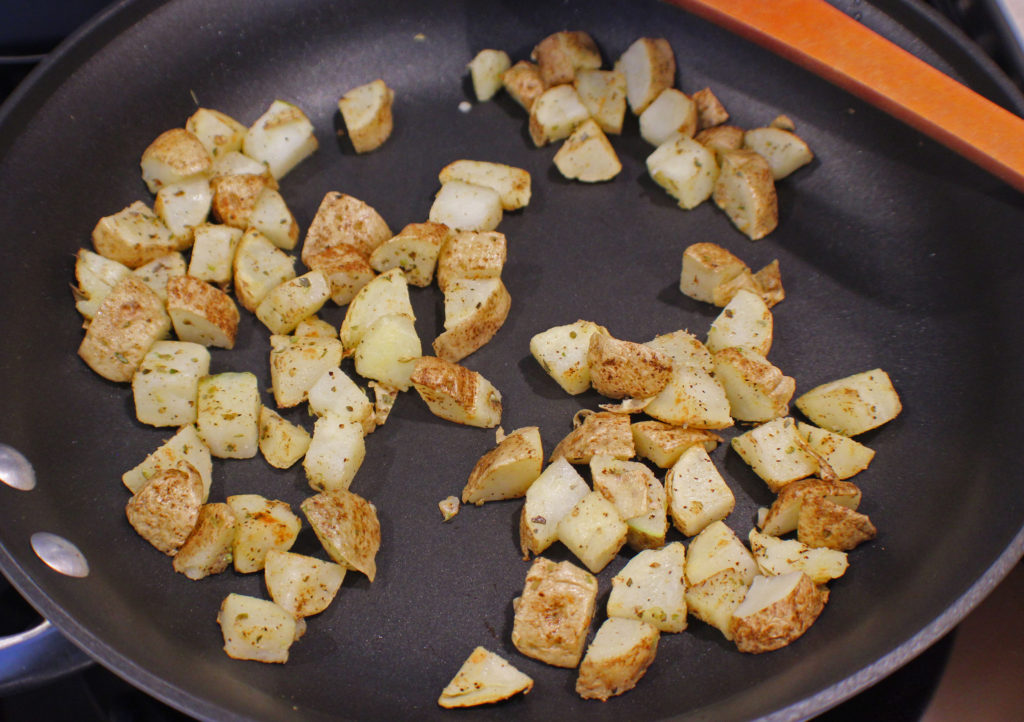
  • Wash the potatoes and stab several times with a fork. Microwave for 2 minutes, turn over and microwave for 2 more minutes. Put in the refrigerator.
  • Gather and prepare the rest of the ingredients, then dice the potatoes.
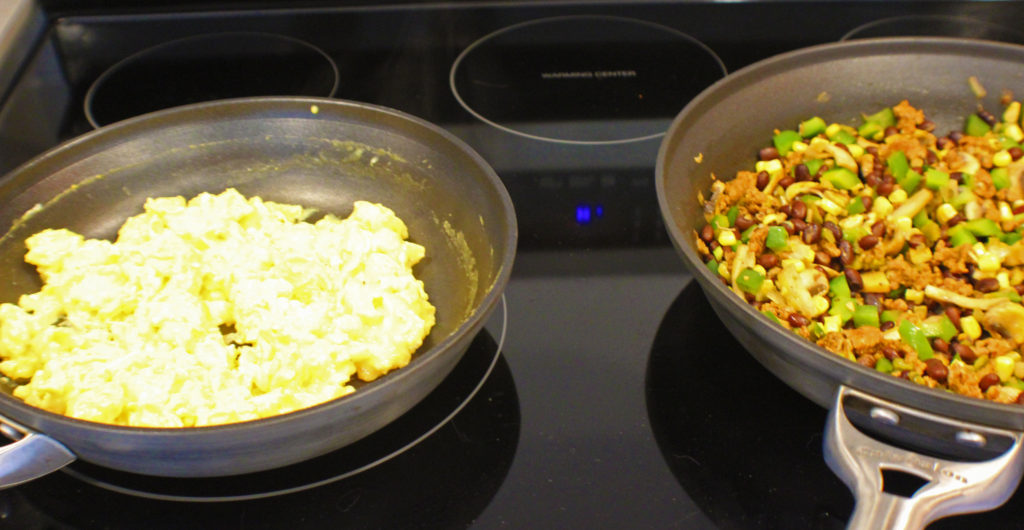
  • In a large nonstick sauté pan, heat over medium heat and add oil. Stir in the potatoes and abut half of the seasonings, and sauté for about 5 minutes to start crisping them.
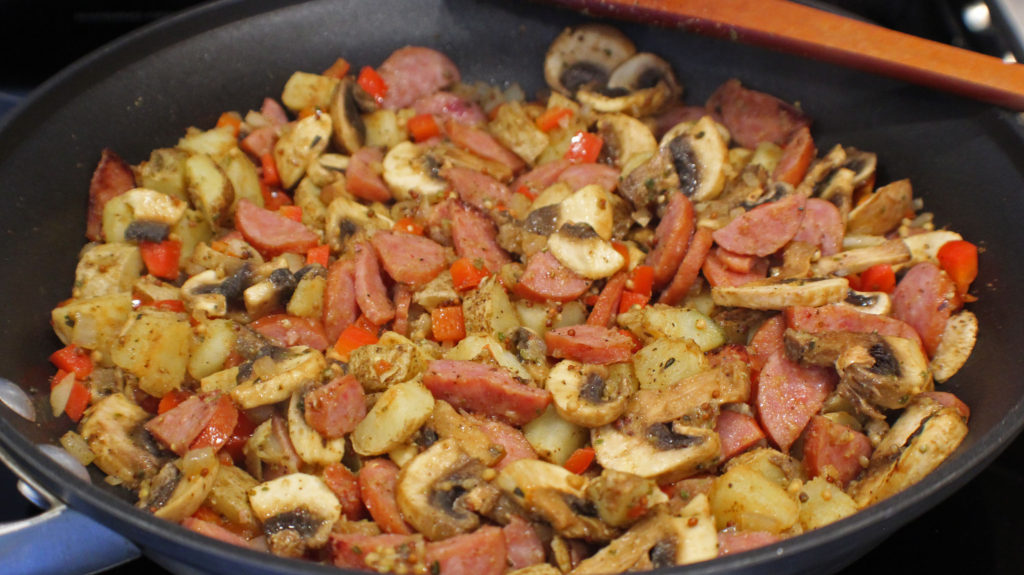
  • Add the kielbasa, the vegetables, except the spinach and sauerkraut, Dijon mustard, and the rest of the seasonings.
  • Sauté for 5 minutes or so to soften the vegetables and crisp the sausage.
  • Stir in the spinach and sauerkraut and cook until it wilts, another 3 to 5 minutes.
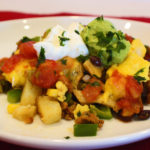
  • Serve as is or top with your favorite skillet toppings.
  • Enjoy!

Nutrition

Calories: 237kcal | Carbohydrates: 5g | Protein: 10g | Fat: 20g | Saturated Fat: 6g | Polyunsaturated Fat: 2g | Monounsaturated Fat: 10g | Cholesterol: 40mg | Sodium: 1089mg | Potassium: 390mg | Fiber: 2g | Sugar: 1g | Vitamin A: 2836IU | Vitamin C: 15mg | Calcium: 59mg | Iron: 2mg

Chile Stuffed Chicken Breasts

Chile Stuffed Chicken and Maize Picante

As far as meat proteins go, I probably use chicken the most. Trying to figure out new and exciting ways to prepare chicken has become a challenge for me that I have happily taken on.

I stuff these chicken breasts with roasted peppers, chiles, and cotija cheese and marinate them in a somewhat spicy, sweet, and tangy marinade to add a lot of flavor to the chicken.

2 larger chicken breasts can easily be cut in half for a meal for 4 people. Try serving this with Cilantro Lime Rice for a delicious meal.

I start by mixing my marinade ingredients in the pan that I’m going to cook my chicken in.

Slice the cheese, peppers and chiles, and butterfly the chicken.

Roll your chicken breasts around in the marinade, ensuring you get it all over and leave them cut side up.

Now it’s time to add the fillings. I like to put the cheese in between the peppers and chiles. Cotija cheese holds up well when baking. You can use a mild feta if you can’t find cotija cheese.

Now fold over the top. Try to stuff everything inside, but a little hanging out won’t really matter.

Cover the pan with a lid or foil and bake at 350 degrees for 45 minutes.

Remove the chicken from the oven and remove the foil or lid. Using a spoon, scoop up some of the liquid and baste the chicken. Return to the oven without a cover and bake for an additional 15 minutes. Make sure the internal temperature of your chicken reaches 165 degrees.

Now it’s time to eat. You could certainly top this off with a dollop of sour cream or guacamole or even some avocado slices, but it is so tender and delicious all on its own. Try this with Cilantro Lime Rice and Maize picante.

Enjoy!

Chile Stuffed Chicken Breasts

Stuffing the chicken with moist chiles and peppers and baking in a marinade makes this chicken super moist and tender to eat. It has a little bit of spice, a little tang, and a little sweetness.
Prep Time10 minutes
Cook Time1 hour
Total Time1 hour 10 minutes
Course: Dinner, Main Course
Cuisine: Tex-Mex
Keyword: Chicken, Chiles and Chicken, Stuffed Chicken
Servings: 4 people
Calories: 104kcal
Author: Eating With Deb

Equipment

  • 1 8 x 8 baking dish
  • Cutting board and knife
  • Citrus Zester

Ingredients

Chicken and Stuffing

  • 2 each chicken breasts butterflied
  • 2 each whole green chiles cut into long strips
  • ½ each roasted red bell pepper cut into long strips
  • 2 ounces cotija cheese 4 to 6 thin slices

Marinade

  • 2 tsp Sambal Oelek chili sauce
  • 1 tbsp olive oil
  • ½ each lime juice and zest
  • 2 tbsp honey
  • 1 tsp fresh ginger minced
  • 1 tbsp cilantro fresh, chopped

Instructions

  • Preheat oven to 350 degrees.
  • In the dish you are going to bake the chicken in, combine the Sambal Oelek, oil, lime juice, honey, ginger, and chopped cilantro.
  • Butterfly the chicken breasts.
  • Slice the cheese, roasted red pepper, and green chiles.
  • Rub both sides of the chicken breasts in the marinade mixture.
  • Place chicken breasts flat, cut side up. On one half of each breast stack half the chiles, half of the cheese, and half of the red bell peppers. Fold over tucking in the ingredients.
  • Cover and bake at 350 degrees for 45 minutes. Remove from oven and use a spoon to baste the tops of the chicken with the sauce that is in the pan. Leave cover off, return to oven and bake for an additional 15 minutes. Check to ensure the chicken has reached an internal temperature of 165 degrees.
  • Cut each breast in half to get 4 servings.
  • Try this with Maize Picante.
  • Enjoy!

Notes

Cotija cheese which is a Mexican Feta does not melt well and will hold up during baking. You can replace it with a mild feta if you cannot find Cotija cheese.
You can find roasted whole green chiles in the Mexican section of the supermarket.

Nutrition

Calories: 104kcal | Carbohydrates: 10g | Protein: 2g | Fat: 7g | Saturated Fat: 3g | Cholesterol: 13mg | Sodium: 197mg | Potassium: 29mg | Fiber: 1g | Sugar: 9g | Vitamin A: 85IU | Vitamin C: 1mg | Calcium: 71mg | Iron: 1mg

Chorizo Skillet Scramble

Chorizo Skillet Scramble

When I decide to make a larger breakfast or brunch I often make some sort of a skillet style breakfast. You know the kind you get served in a restaurant in a sizzling skillet? They are fairly simple to make and you can put whatever you want in them, plus cook the eggs however you like them best. This Chorizo Skillet Scramble is a slightly spicy and very flavorful Tex-Mex style skillet that is wonderful for breakfast, lunch, or dinner.

Skillet style breakfasts take time sautéing and crisping the potatoes, so I microwave the potatoes first to cut out about 1/2 hour of cooking time.

This skillet has a little spiciness to it and can be eaten as is, or put it in a burrito shell for a hand-held, to-go style breakfast. 

After I stab my potatoes several times, and put those in the microwave to cook, I start preparing the rest of my ingredients. Once my potatoes are finished, they only take 4 minutes, I put them in the refrigerator to cool down a bit while I finish preparing my ingredients.

After my ingredients are all gathered and prepared, I take the potatoes out of the refrigerator and dice them up. Those are the first to go in the pan and crisp up. Once done, I put them in my baking dish that I sprayed with cooking oil.

Next in the pan is the chorizo. I like to cook it long enough to get it a little crispy. The oil will be used to sauté the vegetables and beans.

Add to the pan with the chorizo, pepper, mushrooms, onions, and garlic. Sauté this for a couple minutes until the peppers have softened.

And preheat the oven to broil.

Now stir in the beans, corn, chiles, and dry seasonings. Reduce heat to low.

While the beans are heating up, cook the scrambled eggs, or cook the eggs however you want to eat them.

Pour the chorizo mixture over the potatoes, top with the eggs and cheese. Put under the broiler for about 3 minutes to melt the cheese.

Top with sour cream, guacamole or avocado, salsa or fresh tomatoes, and fresh cilantro.

Enjoy!

Chorizo Skillet Scramble

Slightly spicy, yet flavorful Tex-Mex style breakfast skillet for any time of the day. Goes great with fresh biscuits.
Prep Time15 minutes
Cook Time25 minutes
Course: Breakfast, Brunch, Dinner, Main Course
Cuisine: American, Tex-Mex
Keyword: Chorizo, Scramble, Skillet
Servings: 6 people
Calories: 333kcal
Author: Eating With Deb

Equipment

  • Large non-stick sauté pan
  • Medium non-stick sauté pan
  • 7 x 11 oven safe baking dish
  • Microwave
  • Large bowl and whisk
  • Cutting board and knife

Ingredients

Eggs

  • 8 each eggs
  • 1 pinch sea salt
  • 1 pinch black pepper
  • 1 tbsp butter

Potatoes

  • 3 each russet potatoes medium size
  • 1 tbsp vegetable oil
  • 1 pinch sea salt
  • 1 pinch black pepper

Scramble

  • ½ pound chorizo
  • 2 cups mushrooms sliced
  • ½ cup yellow onion chopped
  • 1 tbsp garlic fresh, minced
  • 1 each bell pepper
  • 1 can green chiles
  • 1 can black beans drained and rinsed
  • 1 cup corn frozen
  • ½ tsp basil dry
  • ½ tsp oregano dry
  • ¼ tsp black pepper
  • 1 tsp taco seasoning

Toppings

  • 1 cup co-jack cheese shredded
  • 2 tbsp cilantro fresh, chopped
  • Sour cream
  • Guacamole or an avocado
  • Salsa

Instructions

  • Stab the potatoes several times with a fork. Put on a plate in the microwave and cook for 2 minutes. Flip over and cook another 2 minutes. Remove to the refrigerator to cool.
  • While the potatoes are in the microwave, crack and whip the eggs with a pinch each of salt and pepper and set aside.
  • While the potatoes are cooling, prepare the vegetables, drain and rinse the black bean, open green chiles, and get corn out of the freezer. Then dice the potatoes.
  • On medium heat, heat a large sauté pan. Add the oil and chopped potatoes, and a pinch each of salt and pepper. Cook for 5 minutes, stirring occasionally, until the potatoes are crispy. Put potatoes in the baking dish that has been sprayed with cooking oil.
  • Put pan back on medium low heat and add the chorizo. Sauté for 3 minutes until it is cooked and starting to get crispy.
  • Preheat oven to broil.
  • Add the mushrooms, onions, garlic, and bell pepper. Sauté for 5 minutes until the pepper softens and the onions become translucent.
  • Add the chiles, beans, corn and dry seasoning. Reduce heat to low.
  • In a non-stick sauté pan, melt the butter on medium heat. Add the eggs, stir frequently, and cook for 5 minutes until the eggs are just firm.
  • Pour the chorizo mixture over the potatoes in the oven safe dish. Top with the scrambled eggs and shredded cheese.
  • Put in the oven for 3 minutes until the cheese is melted.
  • To serve top with sour cream, salsa, avocado, and fresh cilantro.

Nutrition

Calories: 333kcal | Carbohydrates: 20g | Protein: 17g | Fat: 21g | Saturated Fat: 11g | Trans Fat: 1g | Cholesterol: 55mg | Sodium: 696mg | Potassium: 389mg | Fiber: 5g | Sugar: 3g | Vitamin A: 533IU | Vitamin C: 10mg | Calcium: 181mg | Iron: 2mg

Smoked Prime Rib

Medium Rare Smoked Prime Rib

I, like most meat eaters, love a good prime rib. I have tried different oven cooking methods, including the one where you cook it at 500 degrees for about 20 minutes, then turn the oven off and let it cook for a couple more hours – just don’t open the oven door. I haven’t had much luck with that method as it’s hard to determine exactly when it will be done.

When I got a smoker, I decided to try my luck with smoking prime rib. It is now the only way I cook prime rib. It is an easy way to cook prime rib, plus I always know when it will be cooked to a perfect medium rare. 

I also put a pan of Au Jus under the prime rib while smoking it. The seasonings and the juices drip into the Au Jus and add additional smoky tastiness to it.

Another bonus to smoking prime rib is it frees up your oven to cook any side dishes that you want with the Smoked Prime Rib.

Prime Rib Ready to Season

Mix together the dry seasonings and put the beef stock in a pan. I by inexpensive foil pans that I use specifically for the smoker, but a metal pan will work too.

Rub the Worcestershire sauce around the outside of the prime rib and then the dry seasoning.

Now prepare your smoker according to the manufacture directions. I like to use hickory chips but use what flavor chips you like. 

Set the smoker to 225 degrees and an internal food temperature to 140 degrees, and do a chip burn.

Put the pan of beef stock under the prime rib. This will catch any drippings from the meat and flavor the au jus. 

Insert the meat thermometer into the thickest part of the meat. It’s ready to start cooking.

I put my prime rib in the smoker fat side up. This way the fat drippings drip down through the meat and help flavor the meat as it cooks.

Prime Rib Wrapped in Butcher Paper

Once the prime rib reaches 100 degrees, wrap it in Butcher Paper. I found mine on Amazon.

Put it back in the smoker and cook until it reaches 140 degrees.

Wrapping it in butcher paper isn’t completely necessary, but it does have it’s benefits. Butcher paper helps the meat retain moisture and it’s more breathable than foil, so it doesn’t create a steaming environment for the meat.

A very important step is to let it rest for 1/2 hour; this helps ensure all of the juices don’t run out upon cutting. You will still have some of the juice run out, but the meat will remain moist and tender.

I purchased an inexpensive foam cooler that I use for resting food from the smoker. I found if I put an old, clean towel in the cooler, then the meat, and close the lid it helps keep it warm during the resting phase.

Smoked Prime Rib Dinner

Now you are ready to carve your perfect medium rare prime rib and enjoy your holiday meal. Don’t forget the Au Jus!

I like to serve prime rib with Asparagus and Mushrooms in a Garlic Balsamic Reduction, or Gingery Green Beans and Mushrooms. Holiday Wild Rice is also a perfect side dish for prime rib and it can be made a day or 2 in advance to save time and stove/oven space.

Enjoy!

Smoked Prime Rib

Prime rib is a great cut of meat to smoke. Put the Au Jus in a foil pan in the smoker to have a delicious, smokey Jus to serve with the Prime Rib.
Prep Time10 minutes
Cook Time4 hours
Resting Time30 minutes
Total Time4 hours 40 minutes
Course: Dinner
Cuisine: American
Keyword: Prime Rib, Smoked Prime Rib, Smoker
Servings: 6 people
Calories: 709kcal
Author: Eating With Deb

Equipment

  • Smoker
  • Foil Pan
  • Cutting board and knife
  • Butcher Paper
  • Cooler to rest Prime Rib in
  • Hickory, Mesquite, or wood chips of your choice

Ingredients

  • 5 pounds prime rib with bones
  • 3 tbsp Worcestershire sauce
  • 2 cups beef stock

Rub Ingredients

  • 1 tbsp paprika
  • 2 tsp granulated garlic
  • 2 tsp sea salt
  • 2 tsp black pepper
  • 1 tbsp brown sugar

Instructions

  • Combine rub seasonings.
  • Rub Worcestershire sauce on outside of prime rib then rub with the seasoning mixture.
  • Put beef stock in a foil pan.
  • Fill wood chip pan 1/3 full of hickory chips or chips of your choice.
  • Prepare smoker according to manufacture directions. Set cook to 225 degrees and internal food temperature to 140 degrees and do a chip burn.
  • Insert meat thermometer into prime rib, then put in the smoker over the pan with the Au Jus. This will catch the drippings from the prime rib and help season the Au Jus.
  • Cook until the prime rib reaches 100 degrees. Remove and wrap with butcher paper. I use some masking tape to help keep the paper closed.
  • Return to smoker and cook to 140 degrees.
  • Remove from smoker, keep it wrapped in the butcher paper, and let it rest for ½ hour before slicing.
  • Enjoy!

Notes

I have a disposable cooler that I line with old towels that I rest my prime rib in to help it stay warm.

Nutrition

Calories: 709kcal | Carbohydrates: 6g | Protein: 33g | Fat: 61g | Saturated Fat: 25g | Cholesterol: 137mg | Sodium: 1120mg | Potassium: 767mg | Fiber: 1g | Sugar: 3g | Vitamin A: 585IU | Vitamin C: 1mg | Calcium: 41mg | Iron: 4mg

Lemon Pepper Linguini with Chicken and Veggies

Lemon Pepper Linguini with Chicken and Veggies

Lemon Pepper Chicken and Veggies is a dish that I often throw together in a pinch but never wrote down a recipe. Kind of like my Chicken and Veggies Pesto Pasta. These are 2 dishes that you can use almost any vegetable you have on hand and is extremely easy to throw together.

Friends started requesting the recipes so I thought it was about time to put one on paper and make it official.

The first step is to cook your noodles, doesn’t have to be linguini, just use whatever you have on hand that you like. Cook them to the package directions for al dente.

Lemon Pepper Linguini Sauce

While your noodles are cooking, mix together the sauce ingredients and prepare the rest of your other ingredients. Use whatever vegetables you like or have on hand. I sometimes replace the zucchini with broccoli.

When the pasta is cooked to al dente, reserve about 1/2 cup of the pasta water, it will be used later to help create a sauce, and strain the noodles. Toss the noodles in with the lemon pepper sauce you just made.

Chicken Mushrooms Zucchini

Heat a large sauté pan on medium heat. Toss the cubed chicken in with the flour and lemon pepper. Add the oil to the pan and the chicken. Sauté the chicken until it starts to brown.

Add the mushrooms, zucchini, and onions. Sauté until the mushrooms and zucchini soften.

Now it’s ready to finish off.

Lemon Pepper Chicken and Veg

Add the rest of the ingredients, including the reserved pasta water. Stir until the spinach wilts and the pasta is hot.

Lemon Pepper Linguini Ready to Eat

This is a great dish to serve family style. Sprinkle parmesan cheese over the top and serve with lemon wedges and warm garlic bread or toast.

Enjoy!

Lemon Pepper Linguini with Chicken and Veggies

Lemon Pepper Chicken Linguini is a light pasta dish with refreshing ingredients that tastes great hot or cold and can be enjoyed any time of the year.
Prep Time15 minutes
Cook Time20 minutes
Total Time35 minutes
Course: Dinner, Entree, Lunch, Main Course
Cuisine: American
Keyword: Chicken, Dinner Ideas, Lemon pepper chicken, Linguini, Pasta, Whats for Dinner
Servings: 6 people
Calories: 256kcal
Author: Eating With Deb

Equipment

  • 6-quart sauce pot
  • Large saute pan
  • 2 medium bowls
  • Cutting board and knife

Ingredients

  • ½ pound linguini

Chicken

  • 2 each chicken breast cubed
  • 2 tbsp flour
  • 2 tsp lemon pepper

Veggies

  • 2 cups mushrooms sliced
  • 1 each zucchini or yellow squash sliced in half moons
  • 2 tbsp yellow onion fine chopped
  • 1 can artichoke hearts drained and chopped
  • 2 each roma tomatoes fine chopped
  • 3 handfuls spinach kale and/or baby chard

Sauce:

  • 1 each lemon zest and juice
  • 1 tbsp parsley chopped
  • 1 tbsp garlic fresh, minced
  • 3 tbsp capers
  • ¼ tsp red pepper flakes optional
  • ¼ tsp black pepper
  • ¼ tsp sea salt

Other ingredients

  • 2 tbsp olive oil
  • 1 tbsp butter
  • ½ cup reserved pasta water
  • 1/3 cup Parmesan cheese shredded

Instructions

  • Cook linguini according to package instructions until al dente, about 10 minutes.
  • Combine sauce ingredients and prepare vegetables.
  • Once linguini is cooked, drain, reserving ½ cup of the pasta water, and stir linguini into sauce. Set aside.
  • In a medium bowl, combine flour and lemon pepper, cut up chicken. Toss chicken in the flour and lemon pepper.
  • Heat a large sauté pan on medium heat, add oil and chicken, brown chicken, about 5 minutes.
  • Add mushrooms, zucchini, and onions, sauté until mushrooms are brown, zucchini has softened, and onions are translucent, about 3 minutes.
  • Add artichoke hearts, tomatoes, spinach, butter, reserved pasta water, and linguini with sauce. Stir and cook until spinach is wilted and everything is nice and hot, about 2 minuutes.
  • Serve and top with Parmesan cheese.
  • Enjoy!

Notes

Using a nonstick sauté pan versus a stainless-steel pan:
A nonstick pan will ensure nothing sticks to the bottom, but the chicken and veggies won’t brown as well.
A stainless-steel pan will create a brown layer on the bottom of the pan that can easily be scraped up when the liquid is added and enhance the flavor of the dish.
My preference is stainless steel, but a nonstick has the benefit of not having to scrape or scrub the pan.

Nutrition

Calories: 256kcal | Carbohydrates: 35g | Protein: 9g | Fat: 9g | Saturated Fat: 3g | Trans Fat: 1g | Cholesterol: 9mg | Sodium: 480mg | Potassium: 308mg | Fiber: 3g | Sugar: 2g | Vitamin A: 1602IU | Vitamin C: 7mg | Calcium: 100mg | Iron: 1mg

Breaded Pork Bites

I originally started making this recipe using whole pork chops, which you can do, just follow all steps except cutting up the pork chops. After a friend tried it, she suggested cutting the pork chop into smaller bites so there was more crunchy breading to enjoy. Once I started cutting the pork chops down, I haven’t gone back. These are great as a main course or an appetizer, dipped in marinara sauce, or just eat them as is.

This is a very quick and easy recipe to make; quick enough to throw together on a busy week night. Just mix the marinade ingredients together – olive oil, mayonnaise, Dijon, and Worcestershire sauce. Cut your pork chops into cubes, or not, and marinate the pork for about 30 minutes. If you are in a hurry, marinate long enough to get your bread crumb mixture ready and your air fryer out.

Next, combine the bread crumbs and Parmesan cheese. If there are allergen issues, there are gluten-free bread crumbs available and if it’s a dairy issue, omit the Parmesan or use a dairy-free Parmesan. Remove the pork from the marinade and roll around in the bread crumb mixture, pressing it into the pork. I like to set the breaded pork on a rack for another 30 minutes. This helps the breading stick to the pork after it’s cooked and you cut into it. Again, this step is not 100 percent necessary, or you can do everything up to this point and put your breaded pork, uncovered, in your refrigerator overnight.

Now it’s time to pull out that air fryer. Spray the bottom of the pan with non-stick cooking oil. Arrange the pork so it is not touching each other – you may have to do this in 2 batches. If you are making 4 whole pork chops, you will probably be able to fit all 4 in at once. Spray the tops with the cooking oil. Turn on your air fryer and set it to 360 degrees for 4 minutes and cook. Turn everything over and repeat – 360 degrees for 4 minutes. I’ve made these many times and they are done at this point, but check the temperature and make sure they have reached 155 degrees.

If you have to do this in 2 batches, put the first batch on a pan lined with parchment paper in a warm oven or a warm toaster oven until the second batch is done.

I usually eat this as a dinner, not an appetizer, generally serving it with Rosemary Parmesan Roasted Potatoes and a vegetable. I steamed some chard this time around.

Breaded Pork Bites

Marinating and breading pork, then cooking it in an air fryer gives you moist, tender, crispy, and delicious bites of pork. These are great as an appetizer dipped in marinara sauce or as the main part of your meal.
Prep Time20 minutes
Cook Time8 minutes
Resting Time1 hour
Total Time1 hour 28 minutes
Course: Appetizer, Entree, Main Course
Cuisine: American
Keyword: Air Fryer, Pork
Servings: 4 people
Calories: 320kcal
Author: Eating With Deb

Equipment

  • Air Fryer

Ingredients

  • 4 each pork chops
  • ¼ cup Worcestershire
  • ¼ cup olive oil
  • 4 tsp Dijon mustard
  • 4 tsp mayonnaise
  • 1 cup bread crumbs Italian seasoned
  • ½ cup parmesan cheese shredded

Instructions

  • Mix together Worcestershire, olive oil, mustard, and mayonnaise. Cut pork chops into bite size pieces and mix into marinade. Let sit at room temperature for 30 minutes.
  • In a separate bowl, combine bread crumbs and parmesan cheese.
  • Remove pork bites from marinade and toss a few at a time into bread crumbs and parmesan. Set aside on a wire rack for 30 minutes (not completely necessary but the drying out process will help the breading stick to the pork when it is cut).
  • Get air fryer ready by spraying the bottom of the basket with cooking spray.
  • Arrange pork bites in bottom of the basket taking care to not over-crowd the basket. You may have to cook in 2 batches. You can put your first batch in a warm oven or toaster oven to keep hot while you are cooking the second batch.
  • Set air fryer to 360 degress and cook for 4 minutes. Turn pork bites over and cook at 360 degrees for another 4 minutes. They should be done and crispy at this point. Double check by making sure the pork has reached an internal temperature of 150 degrees.
  • Enjoy!

Nutrition

Serving: 1each | Calories: 320kcal | Carbohydrates: 23g | Protein: 9g | Fat: 21g | Saturated Fat: 5g | Cholesterol: 11mg | Sodium: 649mg | Potassium: 202mg | Fiber: 1g | Sugar: 4g | Vitamin A: 111IU | Vitamin C: 2mg | Calcium: 219mg | Iron: 2mg

Blended Beet Soup

I know you don’t like beets. They definitely aren’t for everyone, but I happen to love them. The nutritional benefits alone should be enough to convince you to at least give them a try. In this soup, I cut the beets with carrots and potatoes to remove some of the earthy flavors and add a little natural sweetness.

First, gather and prep all your ingredients. Depending on the size chunks you cut your vegetables in will depend on the cooking time, so smaller chunks equals less cook time. I also use beef stock instead of vegetable stock only because I like the flavor better, but use vegetable stock to keep this soup vegetarian, if that is your desire.

Prepping the vegetables is the hardest part of this soup. Once ready, add a little olive oil to a large, hot stock pot and add your onions. Saute for a couple minutes until they turn translucent, then add the garlic and saute for another minute or 2.

Add the rest of the vegetables, the stock and seasonings plus a little sea salt and black pepper. You can add more salt and pepper at the end if necessary.

Bring to a boil and reduce to a simmer. Cook until the vegetables are fork tender, probably 30 to 45 minutes depending on what size you cut your vegetables.

Now it’s time to blend. If you don’t have a stick blender, I recommend investing in one. You’ll be amazed how much easier these are to use than a food processor for many different blended foods. When deciding on one to purchase, make sure the blades are metal.

If you don’t have a stick blender, use a food processor or a stand blender. Just be careful not to overfill, the soup is hot!

Blend until you reach your desired consistency. I prefer not totally pureed, it needs to have some thickness, and a few chunks don’t hurt.

Taste it to see if you need more salt or pepper. I also like to stir in a few handfuls of greens, beet greens, kale, spinach or arugula. It doesn’t matter, just whatever I have on hand. This adds extra nutrients, texture, and flavor.

I like to blend a little prepared horseradish and black pepper with sour cream and top my bowl of soup with a dollop of the sour cream mixture and some fresh parsley or chives.

Any leftovers, I freeze in portion size containers.

A word of caution – don’t be alarmed the next day after your morning constitutional, beets turn things red!

Enjoy!

Blended Beet Soup

Beets are a hard sell for many people. By adding some potatoes and carrots to the beets, they cut the earthy taste and give this soup a little sweetness. Top it with some sour cream seasoned with horseradish and black pepper and you have a wonderful tasting and healthy fall/winter soup.
Prep Time20 minutes
Cook Time45 minutes
Course: Dinner, Soup
Cuisine: American
Keyword: Beets, Dairyfree, Glutenfree, soup, Vegetarian
Servings: 6 cups
Calories: 116kcal
Author: Eating With Deb

Equipment

  • Large Stock Pot
  • Stick Blender or Food Processor

Ingredients

  • 1 tbsp olive oil
  • ¼ cup yellow onion diced
  • 1 tbsp garlic minced, fresh
  • 2 cups beets peeled and diced
  • 2 cups potatoes diced (russets, yellow or red work)
  • 1 cup carrots diced
  • 4 cups vegetable stock or beef stock
  • 1 tsp thyme dry
  • 1 tsp oregano dry
  • Sea salt and black pepper to taste

Instructions

  • In a large stockpot heat olive oil. Add onions and cook for 2 to 3 minutes until translucent. Add the garlic, stir and cook for another 2 minutes.
  • Add in the vegetables, stock, and seasoning. Bring to a boil, reduce heat and simmer for 30 to 45 minutes until the vegetables are fork-tender. The time will vary depending on how big you cut your veggies.
  • Remove from heat and using a stick blender, blend until you reach your desired consistency. Taste and add more salt or pepper if desired.
  • I like to stir in a few handfuls of the beet greens if I have them or some spinach or kale. The heat will wilt the greens.
  • Serve with a dollop of sour cream mixed with prepared horseradish (to taste) and sprinkle on some parsley or chives if desired.
  • Enjoy!

Notes

If you do not have a stick blender you can use a blender or food processor. Just be careful not to overfill, the soup is hot!

Nutrition

Serving: 1cup | Calories: 116kcal | Carbohydrates: 22g | Protein: 3g | Fat: 3g | Saturated Fat: 1g | Sodium: 682mg | Potassium: 520mg | Fiber: 4g | Sugar: 6g | Vitamin A: 3913IU | Vitamin C: 18mg | Calcium: 28mg | Iron: 1mg

Italian Chicken and Veggies

Chicken is a very versatile ingredient that can be used in a wide variety of dishes. This dish can easily be prepared in a saute pan on the stovetop, but I decided to make it even easier by putting it in my slow cooker. What’s easier than 15 minutes of prep the day before and putting it in your slow cooker for a few hours the next day?

As usual, first, start by gathering and preparing your ingredients. You can use your favorite Italian dressing, I happened to have one on hand that I made using a zesty Italian seasoning packet. Otherwise, I always have Olive Garden Italian dressing in my refrigerator.

Cut and prep all your vegetables. If you don’t have zucchini or yellow squash on hand (or don’t like it) you can certainly replace it with some broccoli or another favorite vegetable. Next time I make this I’m going to add a can of drained, quartered artichoke hearts to this mix.

Then it’s as simple as putting it all in your slow cooker crock. I put the chicken on the bottom, add the vegetables, seasonings and dressing.

You can use whatever chicken pieces you want. If using breasts, cut them in half. You can use thighs, bone-in or boneless, or a combination of the 2. You just need 6 pieces of chicken all about the same size.

You can put it in your slow cooker now and turn it on or cover it and put it in the refrigerator overnight.

It will only take about 3 hours to cook depending on your slow cooker. Just make sure your chicken has reached an internal temperature of 165 degrees.

I like eating this with a dinner roll and Quinoa Pilaf.

Italian Chicken & Veggies (Slow Cooker)

A very simple, yet full of flavor chicken and vegetable dish that can be prepped the day before and put in the slow cooker the next day for a quick, no fuss dinner.
Prep Time15 minutes
Cook Time3 hours
Course: Dinner, Main Course
Cuisine: American, Italian American
Keyword: Chicken, Italian Chicken, Slow Cooker
Servings: 6 people
Calories: 63kcal
Author: Eating With Deb

Equipment

  • 4 to 6 quart slow cooker

Ingredients

  • 3 each chicken breasts cut in half
  • 1 each zucchini small, cut in half moons
  • 1 each yellow squash small, cut in half moons
  • 2 cups mushrooms sliced
  • 1 each bell pepper julienned
  • 1 each leek sliced into ½ moons
  • ½ cup Italian dressing
  • 2 tbsp garlic minced
  • 2 tbsp capers
  • 1 tbsp Italian seasoning
  • ½ tsp fennel seeds crushed
  • ½ tsp red pepper flakes crushed
  • ½ tsp black pepper

Instructions

  • Gather and prep all veggies and mince garlic.
  • Add fennel seeds and red pepper flakes to a mortar and crush with the pestle.
  • Cut chicken breasts in half. If they are thick, butterfly the thick pieces.
  • Put chicken in the bottom of a slow cooker crock. Top with the veggies, herbs and seasonings, and then the Italian dressing.
  • Put crock in slow cooker and cook on low for about 3 hours until the chicken reaches 165 degrees.
  • Dish up, top with Parmesan cheese.
  • Enjoy!

Notes

You can easily use chicken thighs or a combination of breasts and thighs. It doesn’t matter if the thighs are boneless or not. I usually use a combination so I can make everyone happy.
If preparing the night before, prepare up to putting all ingredients in the crock, cover and refrigerate overnight.
This dish freezes well.

Nutrition

Calories: 63kcal | Carbohydrates: 5g | Protein: 2g | Fat: 4g | Saturated Fat: 1g | Cholesterol: 1mg | Sodium: 280mg | Potassium: 139mg | Fiber: 1g | Sugar: 3g | Vitamin A: 64IU | Vitamin C: 2mg | Calcium: 23mg | Iron: 1mg

Deconstructed Lasagne

One of the great things about winter is comfort food. There are many wonderful comfort foods, one is lasagne – noodles layered with meat or roasted veggies, covered in saucy, cheesy goodness.

However, sometimes it’s too much work to make, so figuring out a way to get all the flavors and saucy, cheesy goodness into a dish that is much easier to make was high on my list.

First, let’s talk a little bit about the spelling, is it lasagna or lasagne? I always thought that when spelled with an “e” that was the Italian (and everyone else in Europe) way of spelling it and when ending in an “a”, it was the American way of spelling it. A quick google search gave me the answer and I was partially correct, but there is more to it.

Lasagne is plural and lasagna is singular and the name of the noodles. Americans use the word lasagna to refer to the dish in total. Basically, Americans are using the wrong word when referencing is dish – we don’t just get one noodle when we eat a serving of lasagna. However you spell it, it’s a wonderful winter comfort food.


So, let’s make lasagne much simpler. You can use whatever filling you desire. If you only want meat or vegetables, use just that. I like both, but sometimes I only want vegetables. This version gives me a little of both.

Start by gathering and preparing all of your ingredients. You can replace the ground beef with ground turkey, a ground meat substitute, or Italian sausage. If you use sausage, you will want to omit the fennel and probably crushed red pepper flakes.

Yes, my ground beef in this picture is frozen, but that was ok, just put it in your pan, on low heat to start defrosting it, scraping off the meat around the outside as it thaws.

Once your meat is brown, add the vegetables and seasonings and saute for a couple minutes to get them mostly cooked.

While browning the meat and cooking the vegetables, boil your pasta to al dente according to the package instructions. When done, drain and set aside until needed. Do not toss pasta with oil to prevent it from sticking, all this does is prevent the sauce from sticking to and flavoring your noodles.

When cooking pasta – bring your water to a boil before adding salt to the water. Salt can pock mark pans, so if you add the salt before the water is boiling, it will sit on the bottom of the pan creating marks in your pan. Also, don’t add oil to your boiling water – again, all this does is cover your noodles and create a barrier so the sauce cannot flavor the noodles. To keep them from sticking while cooking, keep your water at a rolling boil and stir frequently.

So now we are ready to put this all together. My saute pan was not big enough to mix in, so I grabbed a bowl and mixed it in that. Add your meat mixture, pasta, tomatoes and sauce, and cheese and stir to combine. If your noodles stuck while waiting to get put into the dish, don’t worry, the sauce will “unstick” them.


Once combined, put in a casserole dish that you sprayed with non-stick cooking spray. Top with the bread crumbs and more Parmesan cheese. Cover and put it in your preheated oven and bake for about 30 minutes until all bubbly hot.

Time to sit and enjoy all the saucy, cheesy, flavorful goodnes of lasagne with a nice slice of garlicky cheese toast!

Deconstructed Lasagne

This dish has all the wonderful flavors of lasagna without all the work.
Prep Time20 minutes
Cook Time45 minutes
Course: Main Course
Cuisine: American
Keyword: Lasagna, Pasta
Servings: 12 cups
Calories: 261kcal
Author: Eating With Deb

Equipment

  • Medium Stock Pot
  • Large saute pan
  • 4-quart Casserole Dish

Ingredients

  • 1 pound ground beef extra lean
  • 4 cups mushrooms sliced
  • ½ cup yellow onions diced
  • 1 each bell peppers diced
  • 15 oz can tomato sauce
  • 15 oz can diced tomatoes
  • 2 cups rotini pasta dry
  • 1 tbsp Italian seasoning
  • 2 tsp garlic fresh, minced
  • ½ tsp crushed red pepper flakes
  • ½ tsp fennel seeds
  • 2 cups grated mozzarella cheese
  • ½ c Parmesan cheese grated
  • Topping
  • 1/3 cup Italian seasoned bread crumbs
  • ½ cup parmesan grated

Instructions

  • Gather and prep all ingredients. Crush pepper flakes and fennel seeds using a mortar and pestle.
  • Pre-heat oven to 350 degrees.
  • In a large sauté pan, start browning the ground beef. When almost done add the onions, mushrooms, bell pepper, and seasonings. Sauté for about 5 minutes.
  • While sautéing meat and veggies, cook pasta to al dente according to package directions. Drain and set aside until needed.
  • In the saute pan or a bowl, combine the meat mixture, tomato sauce and diced tomatoes, pasta, and cheese.
  • Spray a 4 (to 6)-quart casserole dish with cooking spray and add pasta mixture. Top with bread crumbs and Parmesan cheese. Cover and bake for 30 minutes until bubbly.
  • Enjoy!

Nutrition

Serving: 1cup | Calories: 261kcal | Carbohydrates: 16g | Protein: 17g | Fat: 14g | Saturated Fat: 7g | Cholesterol: 47mg | Sodium: 561mg | Potassium: 455mg | Fiber: 2g | Sugar: 4g | Vitamin A: 424IU | Vitamin C: 7mg | Calcium: 234mg | Iron: 2mg